Tau Commander

From RelicWiki
| Tau Commander | |||||||||||||||||
| |||||||||||||||||
| Race | Tau | ||||||||||||||||
|---|---|---|---|---|---|---|---|---|---|---|---|---|---|---|---|---|---|
| Version | Soulstorm v1.2 | ||||||||||||||||
| Build Info | |||||||||||||||||
|
| ||||||||||||||||
| Unit Stats | |||||||||||||||||
| Hitpoints | 1000/2 | ||||||||||||||||
| Armour | Commander | ||||||||||||||||
| Morale | 500/12/500 | ||||||||||||||||
| Unit Mass | 25 | ||||||||||||||||
| Move Speed | 16 | ||||||||||||||||
| Sight Radius | 25 (cannot detect) | ||||||||||||||||
| Attachable | No | ||||||||||||||||
| Weapons | |||||||||||||||||
| Ranged | Burst Cannon | ||||||||||||||||
| Melee | Burst Cannon (melee) | ||||||||||||||||
Contents |
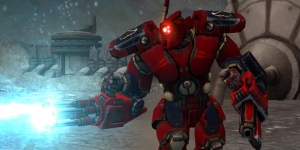
Tau Commander
"I will lead us to victory!"
The Tau Commander is the primary hero of the Tau Empire. Encased in an experimental XV22 Battlesuit, he can use jump jets to quickly get into battle, ready to unleash a barrage of firepower from the many weapon systems his battlesuit can be outfitted with.
In Dark Crusade, Shas'o Kais was tasked with retaking the planet Kronus from its invaders. Commander Or'es'Ka led the Tau in their subjugation of the Kaurava System in Soulstorm.
Tactics
The Tau Commander does very good ranged damage and is good against all targets with the appropriate upgrades. It is important to keep the Tau Commander out of melee, which can be done by slowing enemies with Snare Traps and/or using jump packs to fall back and resume firing from safety. Enemies often target the snare traps, so a good tactic is throwing a Snare Trap behind the Commander, and then jumping behind it once the trap has gone invisible. It is possible to use snare traps rather then Kroot Carnivores to keep melee units away from Fire Warriors, but this should be a temporary arrangement and it requires extra Plasma Generators. However, Snare Traps are most effective in tandem with Kroot auxiliaries; for example, the Commander can lay Snare Traps below Fire Warriors to counter an enemy's jump infantry. The Snare Trap can also be laid on top of a Necron Lord, effectively making the Necron Lord think he got out of the wrong side of bed that morning.
In the early game when facing off at range versus other troops, jump your commander, upgraded with the Flamer, behind the enemy lines to quickly destroy enemy morale. In tier 2, the Tau Commander becomes an effective anti-vehicle unit with the Fusion Blaster and Missile Pods upgrades, but should be assisted by Stealth Suits upgraded with Fusion Blasters against numerous or durable vehicles. Late in the game, the Tau Commander should be used solely for laying Snare Traps and fire support. His low health and inability to attach to another squad means he must be kept behind the bulk of the Tau army and out of direct fire.
The Tau Commander has the lowest health out of all the primary commanders. He can only get his health to 1400 with both Improved Metallurgy and the Ethereal. He deals an amazing amount of damage once fully upgraded, but this firepower doesn't come cheap. A Tau Commander with all weapon upgrades costs ![]() 475
475 ![]() 255 , and if he dies all upgraded weaponry is lost and must be repurchased when he is rebuilt.
255 , and if he dies all upgraded weaponry is lost and must be repurchased when he is rebuilt.
One useful tactic to increase the survivability of the Tau Commander is to look first at his weaponry. With his fragile health, your best bet to keep him alive is through his Missle Pods, which outrange most non-Tau enemy infantry. Though this lessens his damage potential, this tactic can help harass the enemy while your assemble your troops for the assault. And since the enemy always has the tendency to move his/her forces to the area, you can have the chance to see what's in store for you when you finally attack.
Another very useful tactic is for the Tau Commander become a make-shift detection unit while no other allied detection units are in the vicinity. With some excess resources, have the Tau Commander make a wall of Snare Traps in an area or better yet, a choke point, do this as fast and tactical as possible. Though the snare traps do not give an area of sight, they can be monitored easily by memorizing their locations and with the red beam they emit. Once one or two Snare Traps have disappeared, it is easy to assume that your enemy has detected them or is on the move for an assault. This way you can gather your forces and repel an incoming attack. This may also serve as an early warning device as although your Snare Traps cannot detected infiltrated units, they still TRIGGER when one passes nearby. Be warned though, never EVER place one Snare Trap near the other as this will result in triggering more than one Snare Trap and a waste of resources.
Abilities
Snare Trap
| Snare Trap | Hotkey: N | |||
|---|---|---|---|---|
| Requires | Nothing | |||
| Target Types | Any enemy units | |||
| Range | 20 | |||
| Area of effect | 4 | Cooldown time | 10 s | |
| Cost | ||||
| Effects | Places a Snare Trap at the targeted spot on the ground. The trap can be attacked and destroyed as normal (50 HP, Building Low armor type), however it is Infiltrated after 10 seconds. When an enemy unit enters the Snare Trap's area of effect, all enemy units within a radius of 8 from the trigger unit have their weaponry cooldown tripled and lose 90% of their movement speed for 12 s. This destroys the snare trap.
Troops with Teleport or Jump ability can use it to escape the effects of the trap. Units jumping or teleporting over a Snare Trap will not trigger a Snare Trap. Units landing in the trigger radius will set it off, but only the first unit to touch down will be affected. | |||
Target Acquired
| Target Acquired | Hotkey: G | ||||||||||||||||||||||||||||||||||||||||||||||||||||||||||||
|---|---|---|---|---|---|---|---|---|---|---|---|---|---|---|---|---|---|---|---|---|---|---|---|---|---|---|---|---|---|---|---|---|---|---|---|---|---|---|---|---|---|---|---|---|---|---|---|---|---|---|---|---|---|---|---|---|---|---|---|---|---|
| Requires | Nothing | ||||||||||||||||||||||||||||||||||||||||||||||||||||||||||||
| Target Types | Infantry, Heavy Infantry, Commander, Daemon Medium | ||||||||||||||||||||||||||||||||||||||||||||||||||||||||||||
| Range | 35 | ||||||||||||||||||||||||||||||||||||||||||||||||||||||||||||
| Area of effect | 0 | Cooldown time | 120 s | ||||||||||||||||||||||||||||||||||||||||||||||||||||||||||
| Effects | An instant high powered attack from the Tau Commander inflicting damage on the target. This ability automatically targets squad leaders over regular units in the squad. | ||||||||||||||||||||||||||||||||||||||||||||||||||||||||||||
| |||||||||||||||||||||||||||||||||||||||||||||||||||||||||||||
Jump Packs
| Jump Packs | Hotkey: J | |||
|---|---|---|---|---|

| Requires | Jump Packs Research | ||
| Target Types | Terrain | |||
| Range | 50 | |||
| Area of effect | None | Cooldown time | 45 s | |
| Effects | The Tau Commander quickly jumps over any intervening terrain to another location. At full charge the Tau Commander will have two jumps available, requiring 90 s total to charge. | |||
Jumpshot
| Jumpshot | ||||
| Requires | Nothing | |||
| Target Types | All enemy squads | |||
| Range | Melee | |||
| Area of effect | 0 | Cooldown time | Passive ability, once every 5 seconds | |
| Effects | When engaging in melee, the Tau Commander jumps up and shoots the enemy with his main ranged weapon, not the Flamer or Missile Pod. | |||
Weapons
Burst Cannon
| Burst Cannon | |||||||||||||||||||||||||||||||||||||||||||||||||||||||||||||||||||||||||||||||||||||
| |||||||||||||||||||||||||||||||||||||||||||||||||||||||||||||||||||||||||||||||||||||
| Cost | Default Weapon | Range | 40 | Setup Time | 0 s | ||||||||||||||||||||||||||||||||||||||||||||||||||||||||||||||||||||||||||||||||
| Build Time | Default Weapon | Accuracy | 70% | Refire Rate | 1 s | ||||||||||||||||||||||||||||||||||||||||||||||||||||||||||||||||||||||||||||||||
| Area of Effect | 0 | Requires | Nothing | ||||||||||||||||||||||||||||||||||||||||||||||||||||||||||||||||||||||||||||||||||
Burst Cannon (melee)
| Burst Cannon (melee) | |||||||||||||||||||||||||||||||||||||||||||||||||||||||||||||||||||||||||||||||||||||
| |||||||||||||||||||||||||||||||||||||||||||||||||||||||||||||||||||||||||||||||||||||
| Cost | Default Weapon | Range | Melee | Setup Time | 0 s | ||||||||||||||||||||||||||||||||||||||||||||||||||||||||||||||||||||||||||||||||
| Build Time | Default Weapon | Accuracy | 70% | Refire Rate | 1 s | ||||||||||||||||||||||||||||||||||||||||||||||||||||||||||||||||||||||||||||||||
| Area of Effect | 0 | Requires | Nothing | ||||||||||||||||||||||||||||||||||||||||||||||||||||||||||||||||||||||||||||||||||
Weapon Upgrades
Maximum Weapon Upgrades Allowed: 4
Flamer
| Flamer | Hotkey: F | ||||||||||||||||||||||||||||||||||||||||||||||||||||||||||||||||||||||||||||||||||||
|---|---|---|---|---|---|---|---|---|---|---|---|---|---|---|---|---|---|---|---|---|---|---|---|---|---|---|---|---|---|---|---|---|---|---|---|---|---|---|---|---|---|---|---|---|---|---|---|---|---|---|---|---|---|---|---|---|---|---|---|---|---|---|---|---|---|---|---|---|---|---|---|---|---|---|---|---|---|---|---|---|---|---|---|---|---|
| |||||||||||||||||||||||||||||||||||||||||||||||||||||||||||||||||||||||||||||||||||||
| Cost | Range | 15 | Setup Time | 0 s | |||||||||||||||||||||||||||||||||||||||||||||||||||||||||||||||||||||||||||||||||
| Build Time | 20 s | Accuracy | 100% | Refire Rate | 0.5 s | ||||||||||||||||||||||||||||||||||||||||||||||||||||||||||||||||||||||||||||||||
| Area of Effect | Range 5 in a 60 degree arc | Requires | Nothing | ||||||||||||||||||||||||||||||||||||||||||||||||||||||||||||||||||||||||||||||||||
| Notes | The Flamer does not replace any existing weaponry. | ||||||||||||||||||||||||||||||||||||||||||||||||||||||||||||||||||||||||||||||||||||
Missile Pods
| Missile Pods | Hotkey: M | ||||||||||||||||||||||||||||||||||||||||||||||||||||||||||||||||||||||||||||||||||||
|---|---|---|---|---|---|---|---|---|---|---|---|---|---|---|---|---|---|---|---|---|---|---|---|---|---|---|---|---|---|---|---|---|---|---|---|---|---|---|---|---|---|---|---|---|---|---|---|---|---|---|---|---|---|---|---|---|---|---|---|---|---|---|---|---|---|---|---|---|---|---|---|---|---|---|---|---|---|---|---|---|---|---|---|---|---|
| |||||||||||||||||||||||||||||||||||||||||||||||||||||||||||||||||||||||||||||||||||||
| Cost | Range | 10-45 | Setup Time | 0 s | |||||||||||||||||||||||||||||||||||||||||||||||||||||||||||||||||||||||||||||||||
| Build Time | 20 s | Accuracy | 70% | Refire Rate | 2 s | ||||||||||||||||||||||||||||||||||||||||||||||||||||||||||||||||||||||||||||||||
| Area of Effect | 2.5 | Requires | Path to Enlightenment | ||||||||||||||||||||||||||||||||||||||||||||||||||||||||||||||||||||||||||||||||||
| Notes | The Misile Pods do not replace any existing weaponry. This weapon does knockback (30-50 force). | ||||||||||||||||||||||||||||||||||||||||||||||||||||||||||||||||||||||||||||||||||||
Fusion Blaster
| Fusion Blaster | Hotkey: P | ||||||||||||||||||||||||||||||||||||||||||||||||||||||||||||||||||||||||||||||||||||
|---|---|---|---|---|---|---|---|---|---|---|---|---|---|---|---|---|---|---|---|---|---|---|---|---|---|---|---|---|---|---|---|---|---|---|---|---|---|---|---|---|---|---|---|---|---|---|---|---|---|---|---|---|---|---|---|---|---|---|---|---|---|---|---|---|---|---|---|---|---|---|---|---|---|---|---|---|---|---|---|---|---|---|---|---|---|
| |||||||||||||||||||||||||||||||||||||||||||||||||||||||||||||||||||||||||||||||||||||
| Cost | Range | 20 | Setup Time | 0 s | |||||||||||||||||||||||||||||||||||||||||||||||||||||||||||||||||||||||||||||||||
| Build Time | 30 s | Accuracy | 70% | Refire Rate | 1 s | ||||||||||||||||||||||||||||||||||||||||||||||||||||||||||||||||||||||||||||||||
| Area of Effect | 0 | Requires | Path to Enlightenment | ||||||||||||||||||||||||||||||||||||||||||||||||||||||||||||||||||||||||||||||||||
| Notes | The Fusion Blaster replaces the Burst Cannon when upgraded. | ||||||||||||||||||||||||||||||||||||||||||||||||||||||||||||||||||||||||||||||||||||
Plasma Rifle
| Plasma Rifle | Hotkey: P | ||||||||||||||||||||||||||||||||||||||||||||||||||||||||||||||||||||||||||||||||||||
|---|---|---|---|---|---|---|---|---|---|---|---|---|---|---|---|---|---|---|---|---|---|---|---|---|---|---|---|---|---|---|---|---|---|---|---|---|---|---|---|---|---|---|---|---|---|---|---|---|---|---|---|---|---|---|---|---|---|---|---|---|---|---|---|---|---|---|---|---|---|---|---|---|---|---|---|---|---|---|---|---|---|---|---|---|---|
| |||||||||||||||||||||||||||||||||||||||||||||||||||||||||||||||||||||||||||||||||||||
| Cost | Range | 40 | Setup Time | 0 s | |||||||||||||||||||||||||||||||||||||||||||||||||||||||||||||||||||||||||||||||||
| Build Time | 25 s | Accuracy | 70% | Refire Rate | 1 s | ||||||||||||||||||||||||||||||||||||||||||||||||||||||||||||||||||||||||||||||||
| Area of Effect | 0 | Requires | Fusion Blaster and Mont'Ka Command Post/Kauyon Command Post | ||||||||||||||||||||||||||||||||||||||||||||||||||||||||||||||||||||||||||||||||||
| Notes | The Plasma Rifle replaces the Fusion Blaster when upgraded. | ||||||||||||||||||||||||||||||||||||||||||||||||||||||||||||||||||||||||||||||||||||
Researchable Upgrades
Jump Packs Research
| Jump Packs Research | Hotkey: J | |||
|---|---|---|---|---|

| Cost | Research Time | 20 s | |
| Researched From | Cadre Headquarters | |||
| Requires | Nothing | |||
| Effects |
| |||
Improved Metallurgy
| Improved Metallurgy | Hotkey: I | |||
|---|---|---|---|---|

| Cost | Research Time | 25 s | |
| Researched From | Path to Enlightenment | |||
| Requires | Kauyon Command Post | |||
| Effects |
| |||
The Dawn of War Player's Guide
| The Dawn of War Player's Guide - Thought of the day: Knowledge is power, guard it well. | ||||||||
|---|---|---|---|---|---|---|---|---|
| Space Marines | Chaos | Eldar | Orks | Imperial Guard | Tau | Necrons | Dark Eldar | Sisters of Battle |
|
Infantry |
Infantry |
Infantry |
Infantry |
Infantry |
Infantry Tau Commander |
Infantry |
Infantry |
Infantry |
| Space Marines | Chaos | Eldar | Orks | Imperial Guard | Tau | Necrons | Dark Eldar | Sisters of Battle |
|
Vehicles |
Vehicles |
Vehicles |
Vehicles |
Vehicles |
Vehicles |
Vehicles |
Vehicles |
Vehicles |
| Space Marines | Chaos | Eldar | Orks | Imperial Guard | Tau | Necrons | Dark Eldar | Sisters of Battle |
|
Buildings |
Buildings |
Buildings |
Buildings |
Buildings |
Buildings |
Buildings |
Buildings |
Buildings |